Let's Make A Gem - Lesson 3
In PhotoImpact 5
Now we'll create another gem using the gem we saved in Lesson 2 in our Easy Pallette. Open a new image 300 x 300 pixels. Go to the Easy Pallette, Object Library, My Library, and look for the thumbnail of the gem you saved. Drag it onto the new image and it will open.
 click on thumbnail for full-size view
Right-click on the gem image and select Ungroup then click on white background. Your objects are now separated and can be moved individually. We only want the curliques so you can select everything else and delete them until just one of the two S's is left.
We want to re-size it so that is is a lot smaller so select the Transform Tool
then select the S with the Pick Tool. Place your cursor at the bottom
right hand corner and make the S about 1/2 smaller. Now, we want to
select the Rotate Freely Tool  and move the S until it looks like this
 |
Copy and Paste it back as an Object, then under Edit, Rotate & Flip/Flip Horizontally and place it on the other side of this one so your image now looks like this |  |
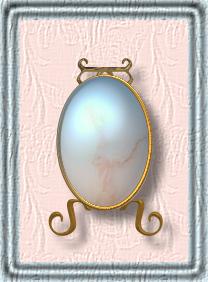
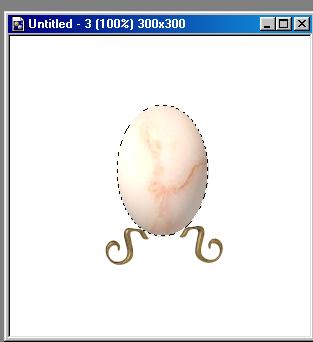
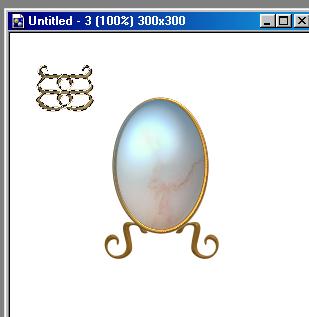
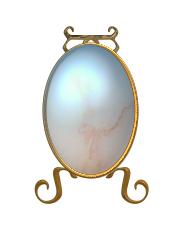
Now, we need to add our gem...I selected an ellipse, but you could choose the shape you wish, or perhaps try several until you find the one you like the best. The image is large enough that you can create the ellipse on it so go ahead. Now go to the Easy Pallette, and to Plastic, then Remove so that your ellipse is GREY. Then, choose Material/Realistic and select Marble 1 and double-click. Your image should now resemble this:
Before we do anything more with the 'legs', let's make a frame for the ellipse by copying it and pasting it back as an image and removing the marble by selecting Remove in Easy Pallette so it is grey. Now change it from 3D Round to 3D Pipe and remember you may have to select the Path Drawing Tool first and also remember that it will be VERY large! Simply adjust the border lever to the left until you have a nice sized frame and using the Pick Tool, move it down on top of the ellipse then select Metallic, Gold 5 and now you have a nice frame around your ellipse.
Now's the time you might want to adjust your 'legs' on either side of the frame until they look okay to you. When you've done that, there is just one more step! Select the ellipse again (not the frame!) and paste it back as 3D Round, Grey.
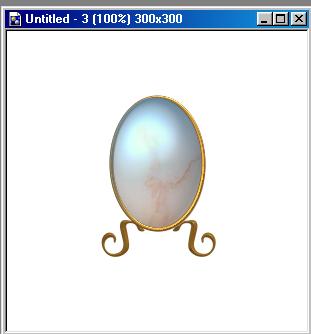
Go down in the Material Gallery to Glass and select Blue 5 and move it on top of the ellipse. The marble shows through and it looks attractive but you may wish to try another glass effect. Remember your Undo feature and have fun! Here's how it looks:
If you wish to add something to the top of the image, why not try a W from Wellsley font, size 50. I used the Transform Tool and rotated it, then I copied and pasted it back as an object and used Edit/Rotate and Flip/Flip Horizontally until it looked like this:
I right-clicked on the Ws and selected Group and then I moved it to the top of the ellipse and selected the Pick Tool and pressed the down arrow several times until I couldn't press it anymore and they were right at the back of the image. With the top 'ww's still selected, I selected Object/Align/Align Vertically just to ensure it was placed correctly.
Remember, if you wanted to keep this, go to the Layer Manager in Easy Pallette and holding Shift Key, select everything then right-click on your image and Group then drag it into the Easy Pallette and name it.
This is a nice image for a set, you could resize it or do whatever you desire with it. Hope you enjoyed the tutorial!