|
Fancy Cabinet Tutorial

Created in Photo Impact
6
 |
Let's
begin by first copying the image on the left to your hard drive.
Open Photo Impact and open a new file, white background, 500 x
500. I also found it extremely helpful for this tutorial
to turn on both the Grid and the Ruler.
With
the Path Drawing Tool, 3D, Circle, draw a circle approx.
250 x 250. Select Material from the Attributes Tool Bar
then Color/Texture and click File, this will browse your hard
drive and you can select where you saved the wood image on the
left which is called walnut-ic.jpg
Having
found it, select it, and your circle is now a walnut-covered
one! Before you leave Materials Drop Down Panel, select
ADD and this will save your circle in My Gallery so you will
know later where to find it as we will make good use of it for
my tutorials 
|
|
|
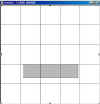
Delete
the circle from the new image, instead draw a rectangle as shown
on the left and line it up on the grid as shown. Go to the
Easy Pallette, My Gallery, and select the walnut circle you
saved. Adjust the border down to 8. Draw a circle,
place it on the rectangle as shown in next image. |


|
Select
the rectangle with the Pick Tool then go to Edit/Mask Mode.
Using the Paint Brush set at 5/Black, carefully cover the circle
where it overlaps the rectangle. It doesn't have to be
perfect but try to ensure all of it is covered.
Delete
the circle.
|
|
|
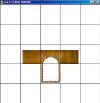
Select
Path Drawing Tool and Custom Shapes/Arch 3. We want to
place it within the arch we created then change it to walnut so
select your saved circle in My Gallery again, change to 3D Pipe
and draw the border down to 4.
|
|
|
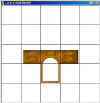
Using
the Path Drawing Tool, Rectangle, draw a drawer. Duplicate
the drawer 4 times and place them as shown at left. You
may have to click on image in order to see it larger. I
used the Resize Tool to make the arch shorter, but you may
decide to leave it this size...just remember that you still have
to put a shelf here and legs. Let's make some legs now. |
|

|
The
leg is simply a elongated oval with some small ovals attached to
it. You can choose to create them in different styles but
if you are following this tutorial, create the first oval,
approximately the size you see in the picture with the grid,
then create a small rounded rectangle for the top, duplicate it
for the bottom, then draw a small oval, duplicate twice and
merge the dowelling as a single object then duplicate it twice.
Put it all together and merge as a single object - duplicate 3
times for the other legs. |
 |
Place
the legs in their appropriate places. In my example to the
left, I have lengthened the arch object just a little from the
image before where I had shortened it (You get to see my work,
blemishes and all ) but
this is how you create - visually. I have enlisted the aid
of a ruler though as you can see and to make the top of the
cabinet, I used a rounded rectangle, border 8, and sized it
approximately 300 pixels wide and 2 pixels deep or high..
Place it on the top of your cabinet. Select your four
cabinet legs and enlist the aid of Object/Align/Space
Evenly/Horizontal. Select the 2 drawers on the left and
Align Horizontally. Repeat this for the 2 drawers on the
right. Select the cabinet top and the cabinet then Align
Horizontally. Now it's time to add our bottom shelf. |
Next
|