|
Fancy Cabinet Tutorial
Page Two
Created in Photo Impact 6
 |
Using
the Path Drawing Tool, create a rectangle for the bottom drawer,
approximately 300 pixels wide, and 50 pixels high, border 8.
Position it where the drawer will be and using the Pick Tool,
Send To Back. When the shelf is in place, use the
Resize Tool to decrease the width if you find it is sticking out
a little at the sides.Duplicate the Top of the Cabinet and pull
it down to cap the shelf. Send it to the back then bring
it forward once so that it caps the shelf.
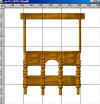
Our
next three items will be the bookshelf edges and the bookshelf
cap. Draw the edge as a rounded rectangle, 200
pixels,border 6, roundness 99, and place it on the left edge
then duplicate it and place the duplicate on the right.
Draw a rectangle 340 pixels wide, 30 pixels high, border 4, and
set it at the top between the edges.
|
 |
Create
a 3D Rounded Rectangle, 3 pixels high by 350 pixels wide, border
6 and set it at the top of our cabinet. I used the rounded
rectangles on the leg for the dowelling at the top; I just added
one more oval to it, merged four of them as a single object then
duplicated it and placed on the corners of the cabinet. I
brought the cabinet top forward which partially covers the top
oval.
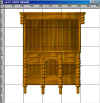
Next,
we will add the back of the cabinet. Draw a Rectangle, 300
pixels wide, 400 high, border 2, place it over the cabinet and
Send To Back. It will be too long so use the resize tool
and decrease the height - do the same if you find the sides
sticking out. While the back of the cabinet is still
selected, change to Path Tool, and select Material from the
Attributes Bar. Select the Bump Tab then select File and
browse to Program Files/Ulead Systems/Ulead
PhotoImpact6/Material/Bump04vb and select it. Go to the
Light Tab, and change the settings to Light 1 Direct/Ambient 2%.
|
 |
Our
shelves come next! Using Rounded Rectangle, 300 width,
very thin - 1 pixel, increase border to 3, and with the aid of
the grid, set 3 shelves evenly inside the top. Send to Back then
bring them ahead so they are visible.
I used
the Burn tool on the bottom shelf to give it some depth. Select
the shelf, then choose Object/Convert Object Type/From Object to
Image. Set the Burn Tool at 20 and go across the width of
the back of the shelf quickly. If you're not satisfied
with the results, redo but change the shelf back to an object
when you are done.
Next
comes the addition of pulls for the drawers and a decoration for
the top. I used the Path Drawing Tool/Custom
Shapes/S-form, Gold2. Duplicate it then move one to the
top. Along the top, I duplicated it, joined them together then
grouped it and duplicated it and centered it on the top.
For the drawers, I resized it, then added a shadow, 5th one in,
Transparency 9, Soft Edge 10, Black. Do the same for the
top decoration - merging it as one object then adding the shadow
|
| I
created a bottle following Cedge's great tutorial
which you can find here if you haven't yet created bottles.
I added a label to my bottle, then resized it and duplicated it
and placed them on the bottom centre shelf. The vases were
made using the Path Tool, 2D, Oval Shape, in the Attributes
Bar/Material, I selected Gradient Colour then I made another
oval, and set it on the top of the oval created the mouth. You
can add a 3d Pipe oval to create a rim as well. I added a
fancy font or design to the front of the vases and simply
changed the gradient colours and whalla! you have some
little vases for the shelf.
Create
plates by drawing a 2d Circle, and in the Easy Pallette,
Materials, Color. select Cream or a colour of your choice. I
added a Reflection to mine, changing it first to 3D. Duplicate
the circle, then change it to 3D Pipe, Border 17, Depth 1, and
add a Fill from Easy Pallette. In the Materials
Attributes, Change Shading from Prong to Metallic, then Paint
Brush set at 6/Black, use Effect/Paint On Edges. Resize
your place and duplicate it as many times as you want. Using
Resize Tool, widen the sides of your plate and you have a large
Serving Plate. Place these items on your shelves and send
them to the back, then bring forward until they appear.
Create
a cup and saucer from the Path Drawing Tools/Custom Shape/Cup -
mine says Path Object 1 - so I am not sure if I changed it from
the original name???? I coloured it cream then I
duplicated the cup and filled it with the same material from the
Fill Gallery then changed it to 3D Pipe to border the cup.
Merge them and resize the cup and set it on the shelf and send
it to the back then forward one.
For
all the shelf items, you can either select each of them and then
merge as a single object and add a Shadow. I used shadow
#3, changing the offsets to 3 and soft edge to 3 as well.
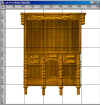
Our
shelf is now complete - ready for company! Hope you
enjoyed this tutorial and happy graphicing!! If you have
any questions or problems, please let me know. Here's our
finished cabinet
|
Back
|


